[안드로이드 스튜디오] Ch7. 이벤트 처리(Event Handling)
2019년 8월 23일 (금)
창업의 길로 가기 위한 두번째 걸음, [안드로이드 스튜디오]로 향해보자!
*질적으로 많이 부족한 글입니다. 지적 및 조언 환영합니다.
*이 글에선 "안드로이드 스튜디오"를 줄여서 "안스" 라고 표현합니다. 참고 바랍니다.

우선, 본인은 학원에서 'JAVA' 기초 수업을 선수강했다. 안드로이드 스튜디오를 배우기 위해선 피할 수 없는 언어이기 때문이다.
(물론 Kotlin 도 있지만, 대한민국에선 아직 JAVA의 파워가 어마어마 하다고..)
이번글에서는 이벤트처리에 대해서 배운다. 디자인적인 부분은 이제 거의 대부분 기본적으로 숙지 되어있어야 하는 시간이다.
기능적 부분이 주가 되므로 정신 똑바로 차려야 한다.
*또한 이번글부터는 코드 복사를 위주로 몇가지 설명과 함께 글을 적을것입니다.
<차례>
1. MyButtonEvent
2. MyButtonEventTest
3. MyCatchEvent
1. MyButtonEvent
위에서 설명했듯이 이 파트까지 오신분들이라면 이제 디자인(레이아웃) 부분은 어느정도 익숙해지신 분들이라 생각된다.
따라서 이 챕터 부터는 길게 주저리 설명하기 보다 코딩 과 함께 결과 사진을 같이 넣는 식으로 간결히 할 생각이다.
*물론 특이사항, 팁은 설명과 함께 포함시킨다.
1.1 결과
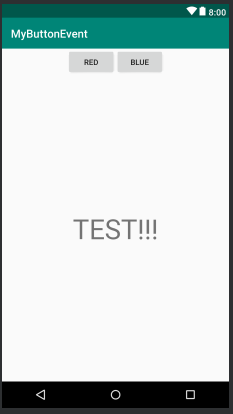
설명: 결과물은 사진1에서 보이는 것 처럼 상단 가운데에 버튼2개, 그리고 밑엔 텍스트뷰가 떠야한다.
텍스트뷰의 역할은 버튼을 누를때마다 색깔이 달라져야 한다는 것 이다. 즉, 버튼과 텍스트뷰가 연결이 되어야한다.
1.2 코드
1.2.1 activity_main
|
1
2
3
4
5
6
7
8
9
10
11
12
13
14
15
16
17
18
19
20
21
22
23
24
25
26
27
28
29
30
31
32
33
34
35
36
37
38
39
40
41
42
43
|
<?xml version="1.0" encoding="utf-8"?>
<androidx.constraintlayout.widget.ConstraintLayout xmlns:android="http://schemas.android.com/apk/res/android"
xmlns:app="http://schemas.android.com/apk/res-auto"
xmlns:tools="http://schemas.android.com/tools"
android:layout_width="match_parent"
android:layout_height="match_parent"
tools:context=".MainActivity">
<LinearLayout
android:layout_width="match_parent"
android:layout_height="match_parent"
android:orientation="vertical">
<LinearLayout
android:layout_width="match_parent"
android:layout_height="wrap_content"
android:gravity="center">
<Button
android:id="@+id/button1"
android:layout_width="wrap_content"
android:layout_height="wrap_content"
android:text= "RED"
/>
<Button
android:id="@+id/button2"
android:layout_width="wrap_content"
android:layout_height="wrap_content"
android:text= "BLUE"
/>
</LinearLayout>
<TextView
android:id="@+id/textView"
android:layout_width="match_parent"
android:layout_height="match_parent"
android:text="TEST!!!"
android:gravity="center"
android:textSize="50dp"
/>
</LinearLayout>
</androidx.constraintlayout.widget.ConstraintLayout>
|
cs |
1.2.2 MainActivity
package com.example.mybuttonevent;

import androidx.appcompat.app.AppCompatActivity;

import android.graphics.Color;
import android.os.Bundle;
import android.view.View;
import android.widget.Button;
import android.widget.TextView;

public class MainActivity extends AppCompatActivity {

    private Button button1, button2;
    private TextView textView;

    @Override
    protected void onCreate(Bundle savedInstanceState) {
        super.onCreate(savedInstanceState);
        setContentView(R.layout.activity_main);

        //버튼과 텍스트뷰...객체화 시킵시다.

        button1 = (Button) findViewById(R.id.button1);
        button2 = (Button) findViewById(R.id.button2);

        textView = (TextView) findViewById(R.id.textView);

        //버튼객체에 이벤트 감시자 등록 (필수), 사실 이게 곧 Listener란 이야기임.
        //어려운건 아니고 내가 이 버튼에 대해서 만큼은 어떤 행동이 실행되게 하겠다는 기능임.
        //- 버튼은 onClickListener 를 이용하게 됨.

        //리스너를 등록할때는 객체에 "setOnClickListener 메서드"를 이용하여 등록 한다.

        button1.setOnClickListener(new View.OnClickListener() {
            // View.OnClickListener() - 최신버전에서는 반드시 앞부분에 클래스명이 적혀야함.

            @Override
            public void onClick(View view) {
                //클릭 또는 선택(터차)했을때 수행되는 메서드
                textView.setBackgroundColor(Color.RED);
            }
        });

        button2.setOnClickListener(new View.OnClickListener() {

            @Override
            public void onClick(View view) {

                textView.setBackgroundColor(Color.BLUE);
            }
        });
    }
}
2. MyButtonEventTest
2.1 결과

설명: EditText속에는 반드시 숫자를 입력해야 한다.
그런데 그 입력한 숫자가 거꾸로했을때 다른숫자가 되면 텍스트뷰란에 "false"가 뜨며,
같은숫자가 되면 "true"가 나온다.
2.2 코드
2.2.1 activity_main
마찬가지로 디자인 파트는 밑의 코드를 확인.
이 디자인의 핵심 포인트는 총 두가지다.
첫번째, 모든 뷰들에 아이디가 추가된다.(왜? 기능부분에서 사용되어져야하기때문에)
두번째, EditText에서는 inputType을 적어주는 것이 좋다. (왜? 평소 사용하지 않으면 기억 안나니까)
|
1
2
3
4
5
6
7
8
9
10
11
12
13
14
15
16
17
18
19
20
21
22
23
24
25
26
27
28
29
30
31
32
33
34
35
36
37
38
39
40
41
42
43
44
|
<?xml version="1.0" encoding="utf-8"?>
<androidx.constraintlayout.widget.ConstraintLayout xmlns:android="http://schemas.android.com/apk/res/android"
xmlns:app="http://schemas.android.com/apk/res-auto"
xmlns:tools="http://schemas.android.com/tools"
android:layout_width="match_parent"
android:layout_height="match_parent"
tools:context=".MainActivity">
<LinearLayout
android:layout_width="match_parent"
android:layout_height="match_parent"
android:orientation="vertical">
<LinearLayout
android:layout_width="match_parent"
android:layout_height="wrap_content">
<EditText
android:id="@+id/editText"
android:layout_width="300dp"
android:layout_height="wrap_content"
android:inputType="number"/>
<Button
android:id="@+id/button1"
android:layout_width="wrap_content"
android:layout_height="wrap_content"
android:textSize="25dp"
android:text="start"
/>
</LinearLayout>
<TextView
android:id="@+id/textView"
android:layout_width="match_parent"
android:layout_height="match_parent"
android:text="Start!!!"
android:gravity="center"
android:textSize="50dp"
/>
</LinearLayout>
</androidx.constraintlayout.widget.ConstraintLayout>
|
cs |
2.2.2 MainActivity
package com.example.mybuttoneventtest;

import androidx.appcompat.app.AppCompatActivity;

import android.graphics.Color;
import android.os.Bundle;
import android.util.Log;
import android.view.View;
import android.widget.Button;
import android.widget.EditText;
import android.widget.TextView;

public class MainActivity extends AppCompatActivity {

    private EditText editText;
    private Button button1;
    private TextView textView;

    @Override
    protected void onCreate(Bundle savedInstanceState) {
        super.onCreate(savedInstanceState);
        setContentView(R.layout.activity_main);

        editText = (EditText) findViewById(R.id.editText);
        button1 = (Button) findViewById(R.id.button1);
        textView = (TextView) findViewById(R.id.textView);

        button1.setOnClickListener(new View.OnClickListener() {
            @Override
            public void onClick(View view) {
                String str = editText.getText().toString().trim();
                //이를 통해 String객체로 Text를 리턴하게 된다.

                String str2 = "";
                for(int i = str.length() - 1; i>=0; i--){


                    str2+=str.charAt(i);


                }
                if(str.equals(str2)){
                    textView.setText("True");

                }else{
                    textView.setText("False");

                }

            }
        });

    }
}
3. MyCatchEvent
2.1 결과

설명: Catch Event 버튼을 클릭하면 빨간색 박스안에 "event" 와 "no event' 가 번갈아 뜬다.
또한, 빨간 박스안에 이러한 문구가 나오고 터치(또는 클릭)을 하게되면 Toast형식으로 알림이 "action down!" 이라고 뜬다.
2.2 코드
2.2.1 activity_main
<?xml version="1.0" encoding="utf-8"?>
<androidx.constraintlayout.widget.ConstraintLayout xmlns:android="http://schemas.android.com/apk/res/android"
    xmlns:app="http://schemas.android.com/apk/res-auto"
    xmlns:tools="http://schemas.android.com/tools"
    android:layout_width="match_parent"
    android:layout_height="match_parent"
    tools:context=".MainActivity">

    <RelativeLayout
        android:layout_width="match_parent"
        android:layout_height="match_parent">

        <TextView
            android:id="@+id/textView1"
            android:layout_width="match_parent"
            android:layout_height="wrap_content"
            android:text="Result : "
            android:textSize="30dp" />
        <Button
            android:id="@+id/button"
            android:layout_width="match_parent"
            android:layout_height="wrap_content"
            android:text="Catch Event!!"
            android:textSize="30dp"
            android:layout_alignParentBottom="true" />
        <TextView
            android:id="@+id/textView2"
            android:layout_width="200dp"
            android:layout_height="200dp"
            android:layout_centerInParent="true"
            android:gravity="center"
            android:background="#ff0000"
            android:textColor="#000000"
            android:textSize="30dp"
            />


    </RelativeLayout>

</androidx.constraintlayout.widget.ConstraintLayout>
2.2.2 MainActivity
package com.example.mycatchevent;

import androidx.appcompat.app.AppCompatActivity;

import android.os.Bundle;
import android.util.Log;
import android.view.MotionEvent;
import android.view.View;
import android.widget.Button;
import android.widget.TextView;
import android.widget.Toast;

public class MainActivity extends AppCompatActivity {

    //멤버변수 작업
    private Button button;
    private TextView textView1,textView2;
    private boolean check;

    @Override
    protected void onCreate(Bundle savedInstanceState) {
        super.onCreate(savedInstanceState);
        setContentView(R.layout.activity_main);

        //객체화 작업
        textView1 = (TextView)findViewById(R.id.textView1);
        textView2 = (TextView)findViewById(R.id.textView2);
        button = (Button) findViewById(R.id.button);

        //Log.i("check",check + "");

        button.setOnClickListener(new View.OnClickListener() {
            @Override
            public void onClick(View view) {
                if(check){
                    textView2.setText("No Event");
                }else{
                    textView2.setText("Event");
                }

                check =! check;
            }
        });

        //textView2를 터치할때 이벤트 처리를 할 것 이다.
        //그러면 우리는 여기서 OnTouchListener를 사용할 것 이다.

        textView2.setOnTouchListener(new View.OnTouchListener() {

            //MotionEvent에는 3가지의 상태값이 있다.
            //1.Action_DOWN: 손가락을 내린다.
            //2.Action_UP: 손가락을 올린다.
            //3.Action_MOVE: 손가락을 움직인다.
            //MotionEvent의 상태값은 getAction()메소드를 통해서 상태를 구별할 수 있다.
            @Override
            public boolean onTouch(View view, MotionEvent motionEvent) {

                String msg = null; //TextView1에 출력될 문자열
                int x = 0; //x좌표
                int y = 0; //y좌표

                switch (motionEvent.getAction()){
                    case MotionEvent.ACTION_DOWN:
                        Toast.makeText(MainActivity.this,"Action Down!!!", Toast.LENGTH_SHORT).show();
                        break;
                    case MotionEvent.ACTION_UP:
                        break;
                    case MotionEvent.ACTION_MOVE:
                        break;

                }


                return false;
            }
        });

    }
}